I had the honor to speak at WCEU 2020 thanks to WooCommerce, who hosted me in their Sponsor track. It was a short and sweet lightning talk on the first day (Friday), called “Customizing The WooCommerce Checkout To Improve Conversions“, followed by a live coding session on Saturday.
Here’s the video recording of the lightning talk, as well as a few PHP and CSS snippets you can copy/paste to improve your WooCommerce Checkout and immediately expect an increase in conversion rate. So, enjoy the video and then go test the snippets you find below!
Video: Customizing The WooCommerce Checkout To Improve Conversions
The WooCommerce Checkout is the most important page of your website. Which means, you’ve got to optimize it.
In this presentation, I take a look at successful ecommerce B2C websites and see what they do. Maybe we can identify trends and weaknesses and get to work on that.
Please note there are subtitles available. Simply click on the “CC” button in the bottom right of the video player.
10 PHP & CSS WooCommerce Checkout Conversion Rate Optimization Snippets
In the follow-up session, I shared my screen and started live coding what we learned during the lightning talk. In a nutshell, we decided to take action on the following points:
- Remove header, sidebar, footer so there are no distractions and customer is fully focused on the only remaining call to action – the “PAY” button
- Move the order summary, shipping and payment method selection to the right hand side so it’s always visible
- Split the long layout made of billing, shipping, order notes, coupon form etc. in visual steps
- Move coupon form to the bottom to avoid coupon fraud
- Keep the shipping form always “open” as that’s the most important section for B2C
- Move the billing form below shipping form
- Remove unnecessary billing/shipping fields; the more fields the lower your conversion rate!
- Make the shipping method selection stand out more, because the default layout is quite poor
- Add an “edit cart” link so users can go back to the Cart page and edit their order
- Add security badges / phone / FAQs to let the customer trust your online business
But before coding, let’s take a look at the tools stack.
Theme: I used the official WooCommerce theme, Storefront. This already comes with some inbuilt CSS customization for the checkout. Another fav of mine could have been Shoptimizer, a theme built for WooCommerce speed and conversions. Anyhow, because one of the snippets is about removing header and footer from the checkout page, I therefore used my Storefront theme visual hook guide, so I know which hooks to use.
Hooks: on top of using my visual hook guide for Storefront, we also require to know all the WooCommerce Checkout hooks. My WooCommerce Visual Hook Guide for the Checkout Page is perfect for what we need.
Docs: WooCommerce has a nice document that explains how to customize checkout fields. In one of the snippets we will remove some of the billing/shipping fields, so this is a must-know reference.
1. PHP Snippet: Remove header, sidebar and footer @ WooCommerce Checkout Page
This snippet is valid for the Storefront theme only. You will need to adjust the code for your customized theme.
/**
 * @snippet       Storefront Theme Remove Header Footer @ Checkout
 * @how-to        Get tutoraspire.com FREE
 * @author        Tutor Aspire
 * @testedwith    WooCommerce 4.1
 * @donate $9     https://www.tutoraspire.com
 */

add_action( 'wp', 'tutoraspire_unhook_storefront_functions' );

function tutoraspire_unhook_storefront_functions() {
if ( is_checkout() ) {
remove_all_actions( 'storefront_header' );
remove_action( 'storefront_before_content', 'woocommerce_breadcrumb', 10 );
remove_action( 'storefront_sidebar', 'storefront_get_sidebar', 10 );
remove_action( 'storefront_footer', 'storefront_footer_widgets', 10 );
}
}
On Storefront, once you remove the sidebar with the above remove_action call, the layout won’t automatically adjust to full-width. The sidebar will go away but it’s “space” will remain there and push the checkout form to the left.
That means we also need a bit of CSS to fix that:
@media (min-width: 768px) {
.woocommerce-checkout.right-sidebar .content-area {
width: 100%;
float: none;
margin-right: 0;
}
}
Need a visual proof? Click here to view the WooCommerce Checkout page customization “before” and “after” screenshots.
2. CSS Snippet: Move Order Review To Top Right @ WooCommerce Checkout Page
The Storefront theme already does that out of the box! So, it seems they studied ecommerce trends as well and decided that was the right choice.
Of course, most themes do not do that by default. For inspiration, you can try copying Storefront’s CSS (you may need to change some selectors):
@media (min-width: 768px) {

/* Billing & Shipping @ Left */

.col2-set {
width: 52.9411764706%;
float: left;
margin-right: 5.8823529412%;
}

/* Order Review @ Right */

#order_review_heading, #order_review {
width: 41.1764705882%;
float: right;
margin-right: 0;
clear: right;
}

}
Now, I’d also like to make the whole Order Review “sticky”. Which means, once a user scrolls down to fill out checkout fields for example, the Order Review box (now on the top right) should stay visible and “fixed” to the top of the browser.
I’ve tried the following CSS but unfortunately it doesn’t seem to work (Storefront theme). Can you help maybe?
#order_review {
    position: sticky;
    top: 0;
}
Need a visual proof? Click here to view the WooCommerce Checkout page customization “before” and “after” screenshots.
3. PHP Snippet: Move coupon form to the bottom @ WooCommerce Checkout Page
We can use the Visual hook guide for the checkout for this. First, we remove it, then we readd it at the very bottom.
/**
 * @snippet       Move Coupon @ Checkout Bottom
 * @how-to        Get tutoraspire.com FREE
 * @author        Tutor Aspire
 * @testedwith    WooCommerce 4.1
 * @donate $9     https://www.tutoraspire.com
 */

remove_action( 'woocommerce_before_checkout_form', 'woocommerce_checkout_coupon_form', 10 );

add_action( 'woocommerce_after_checkout_form', 'woocommerce_checkout_coupon_form', 10 );
Need a visual proof? Click here to view the WooCommerce Checkout page customization “before” and “after” screenshots.
4. PHP Snippet: Keep the shipping form always “open” @ WooCommerce Checkout Page
Thankfully if you look at form-shipping.php template file, WooCommerce gives us a filter here:
apply_filters( 'woocommerce_ship_to_different_address_checked', 'shipping' === get_option( 'woocommerce_ship_to_destination' ) ? 1 : 0 )
Which means I can now code a simple PHP snippet to override that behavior:
/**
 * @snippet       Shipping Always Open @ Checkout
 * @how-to        Get tutoraspire.com FREE
 * @author        Tutor Aspire
 * @testedwith    WooCommerce 4.1
 * @donate $9     https://www.tutoraspire.com
 */

add_filter( 'woocommerce_ship_to_different_address_checked', 'tutoraspire_open_shipping_checkout' );

function tutoraspire_open_shipping_checkout() {
return 1;
}
Need a visual proof? Click here to view the WooCommerce Checkout page customization “before” and “after” screenshots.
5. CSS Snippet: Move the billing form below shipping form @ WooCommerce Checkout Page
First of all, Billing and Shipping forms must be made full-width. Storefront theme already does that, so in case you’re using another theme, try with this:
.col2-set .col-1, .col2-set .col-2 {
float:none;
width: 100%
margin: 0;
}
Once you have Billing and Shipping one above the other, we want now to feature the Shipping form first (top) and Billing form after (bottom). Doing this with PHP is possible, but there is a much neater way to accomplish it: CSS flex.
.col2-set {
    display: flex;
    flex-direction: column;
}

.col2-set > .col-1 {
order: 2;
}

.col2-set > .col-2 {
order: 1;
}
In a nutshell, I’m declaring that the customer details (Billing & Shipping forms wrapper) displays as “flex”. In this way, I can use the “order” property and switch the vertical order of the Billing and Shipping divs.
Need a visual proof? Click here to view the WooCommerce Checkout page customization “before” and “after” screenshots.
6. PHP Snippet: Split the long layout made of billing, shipping, order review into visual steps @ WooCommerce Checkout Page
Here we use once again the visual hook guide, and print 3 new divs in specific positions (above shipping, above billing, above order review).
/**
* @snippet Add Visual Steps @ Checkout
* @how-to Get tutoraspire.com FREE
* @author Tutor Aspire
* @testedwith WooCommerce 4.1
* @donate $9 https://www.tutoraspire.com
*/
add_action( 'woocommerce_checkout_shipping', 'tutoraspire_checkout_step1' );
function tutoraspire_checkout_step1() {
echo 'STEP1
';
}
add_action( 'woocommerce_checkout_billing', 'tutoraspire_checkout_step2' );
function tutoraspire_checkout_step2() {
echo 'STEP2
';
}
add_action( 'woocommerce_checkout_before_order_review_heading', 'tutoraspire_checkout_step3' );
function tutoraspire_checkout_step3() {
echo 'STEP3
';
}
Of course we also need some CSS:
.steps {
background: black;
color: white;
display: inline-block;
padding: 0.5em 2em;
}
Need a visual proof? Click here to view the WooCommerce Checkout page customization “before” and “after” screenshots.
7. PHP Snippet: Remove unnecessary billing/shipping fields @ WooCommerce Checkout Page
Here, the documentation reference I shared above comes to the rescue. The “woocommerce_checkout_fields” filter allows us to “unset” fields we don’t need.
/**
 * @snippet       Remove Ship/Bill Fields @ Checkout
 * @how-to        Get tutoraspire.com FREE
 * @author        Tutor Aspire
 * @testedwith    WooCommerce 4.1
 * @donate $9     https://www.tutoraspire.com
 */

add_filter( 'woocommerce_checkout_fields' , 'custom_override_checkout_fields' );

function custom_override_checkout_fields( $fields ) {

     unset(
 $fields['order']['order_comments'],
 $fields['shipping']['shipping_company'],
 $fields['shipping']['shipping_address_2'],
 $fields['billing']['billing_company'],
 $fields['billing']['billing_address_2'],
 $fields['billing']['billing_postcode'],
 $fields['billing']['billing_phone']
     );

     return $fields;
}
Need a visual proof? Click here to view the WooCommerce Checkout page customization “before” and “after” screenshots.
8. PHP Snippet (Idea): Make the shipping method selection stand out more @ WooCommerce Checkout Page
This is the most difficult snippet, and that’s because WooCommerce is not really flexible in this regard. To demonstrate that, we first need to find out how the shipping method form is generated.
In the checkout “order review” template we find this PHP:
cart->needs_shipping() && WC()->cart->show_shipping() ) : ?>
It’s evident that we need to study how wc_cart_totals_shipping_html() function works, to see if there are any filters that allow us to customize the output.
Unfortunately, that function simply calls the cart-shipping.php template file thanks to the wc_get_template() function; I say unfortunately because that same template is also used on the Cart page.
Now, this is getting more complicated than I though, but if we wish to take the shipping method form out of that order review table we basically need to write or own custom template (e.g. checkout-shipping.php), place it in the /woocommerce folder of our child theme, and then use the wc_get_template filter to load our alternative template on the checkout page only. Kinda complex, but doable – I’ll leave it up to you 😀
Need a visual proof? Click here to view the WooCommerce Checkout page customization “before” and “after” screenshots.
9. PHP Snippet: Add an “edit cart” link @ WooCommerce Checkout Page
Because we removed all links from the Checkout page, it’s fair to give the user a chance to get back to the Cart page in case they want to change quantities or remove products.
You can pick any WooCommerce Checkout hook, but in this case I selected the “woocommerce_checkout_before_order_review” one, which is positioned right below the “Your Order” heading.
/**
 * @snippet       Add edit cart link @ Checkout
 * @how-to        Get tutoraspire.com FREE
 * @author        Tutor Aspire
 * @testedwith    WooCommerce 4.1
 * @donate $9     https://www.tutoraspire.com
 */

add_action( 'woocommerce_checkout_before_order_review', 'tutoraspire_edit_cart_checkout' );

function tutoraspire_edit_cart_checkout() {
echo 'Edit Cart';
}
With a bit of CSS, you can also position this on the same line as “Your Order” and save some space.
Need a visual proof? Click here to view the WooCommerce Checkout page customization “before” and “after” screenshots.
10. PHP Snippet: Add phone number @ WooCommerce Checkout Page
You can add whatever content you wish to the Checkout page, mostly if it helps potential customers trust your business.
Usually you would add secure payment badges, FAQ or contact links, as well as an immediate way to get in touch with you (live chat and phone number).
So, this is how to add a phone number right below the “PLACE ORDER” button on the checkout page.
/**
 * @snippet       Phone Number @ Checkout
 * @how-to        Get tutoraspire.com FREE
 * @author        Tutor Aspire
 * @testedwith    WooCommerce 4.1
 * @donate $9     https://www.tutoraspire.com
 */

add_action( 'woocommerce_review_order_after_submit', 'bloomer_phone_checkout_page' );

function bloomer_phone_checkout_page() {
?>
Need help? Give us a call at +1 123456789
Need a visual proof? Click here to view the WooCommerce Checkout page customization “before” and “after” screenshots.
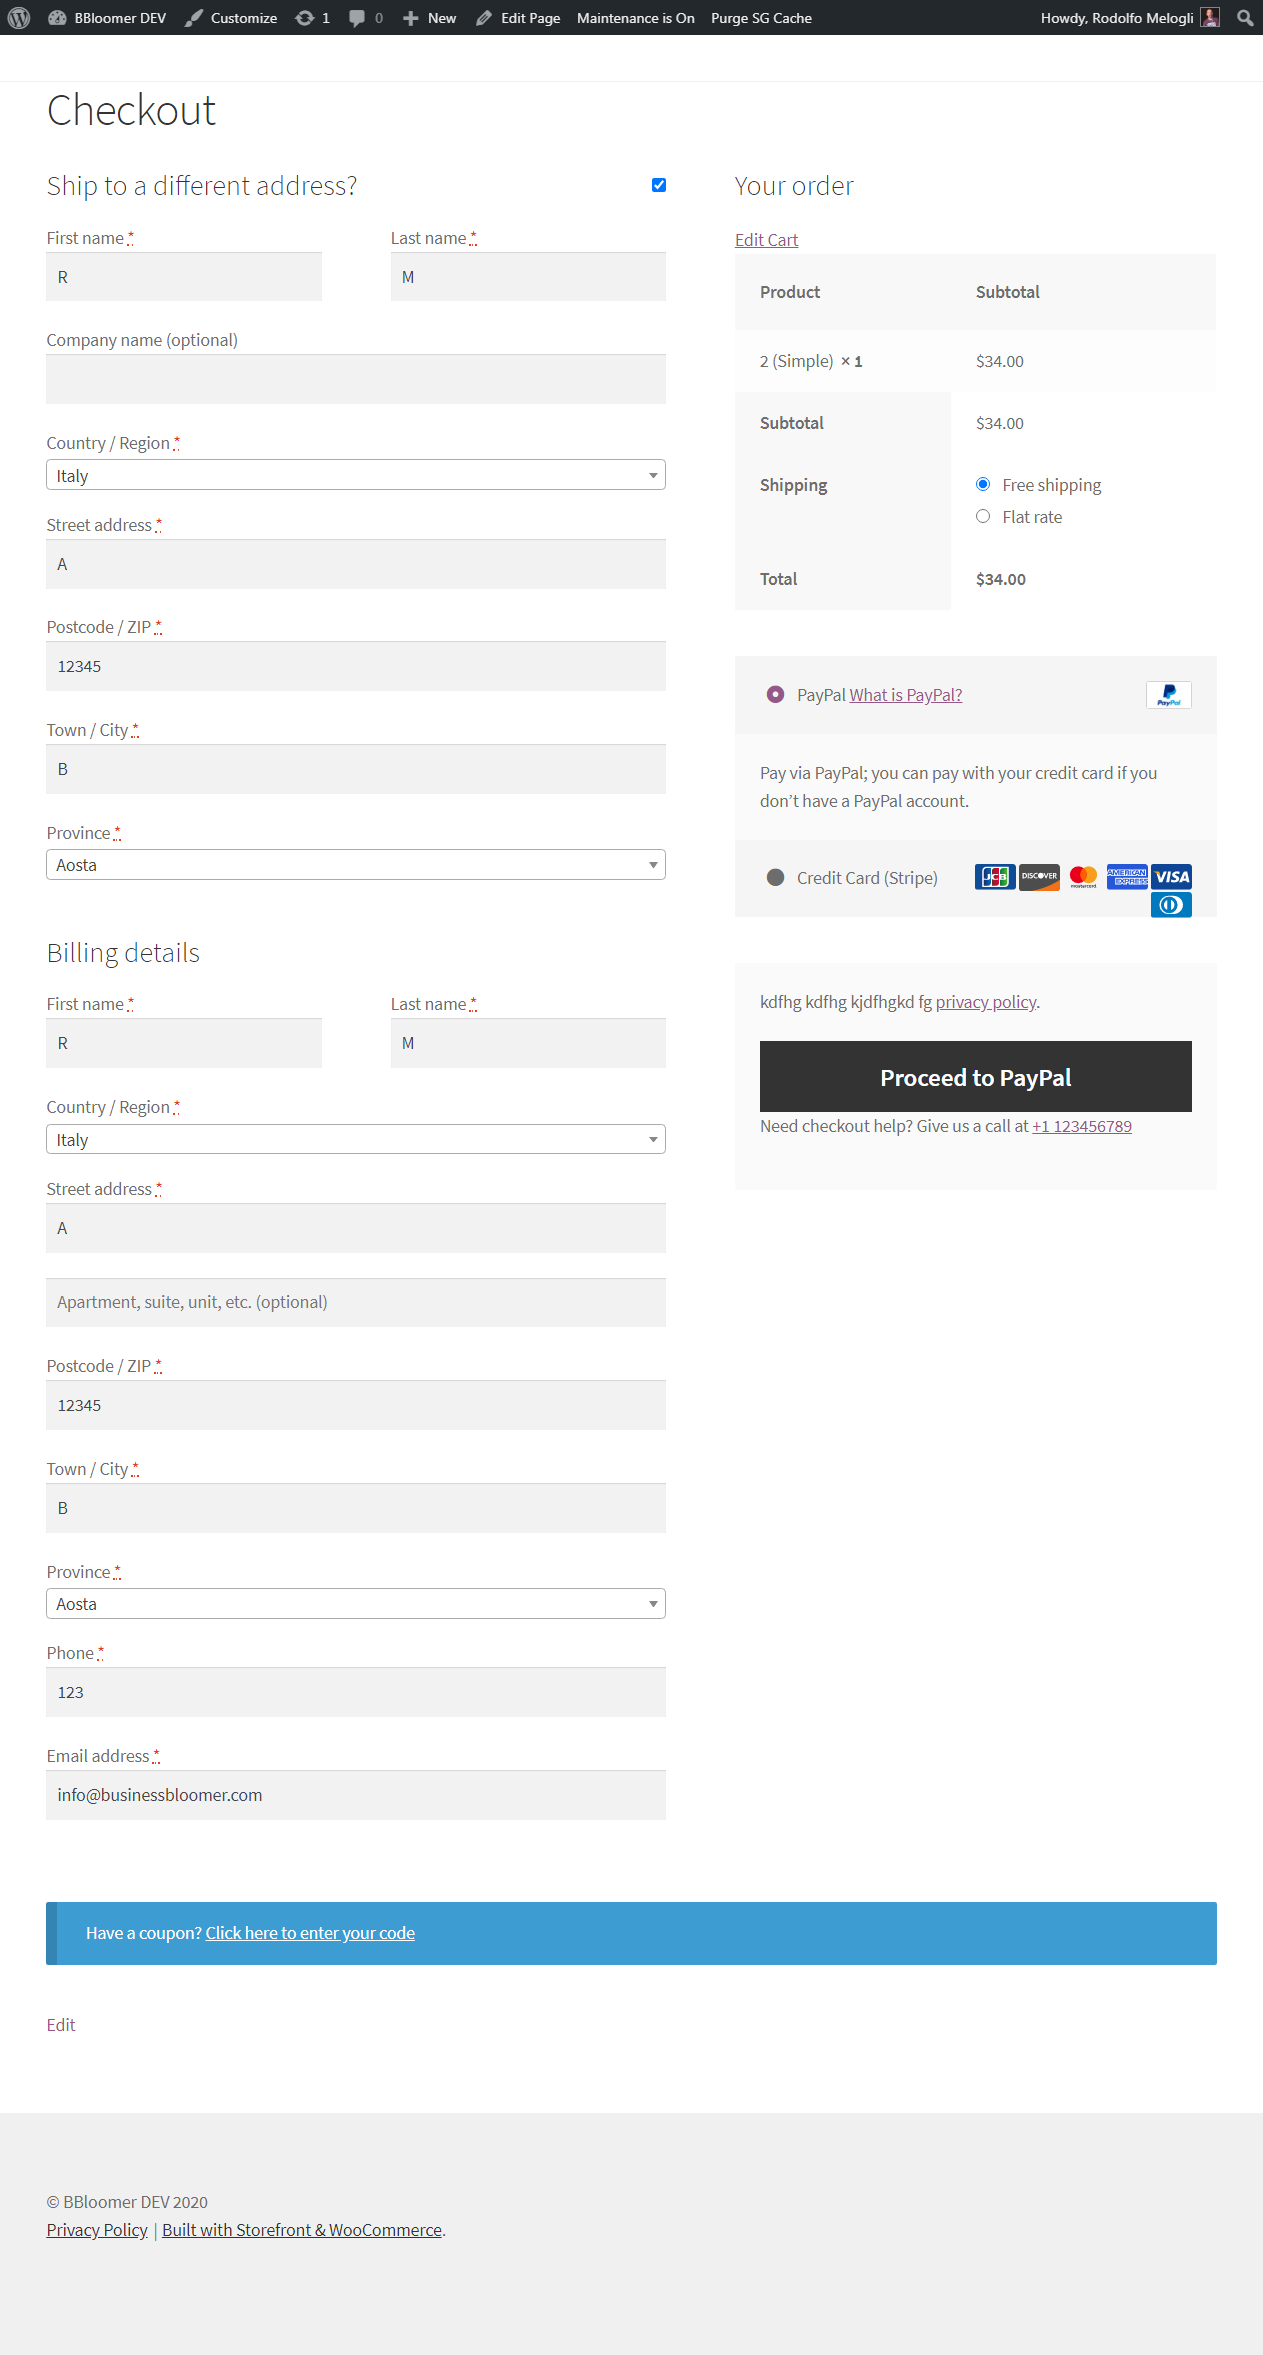
WooCommerce Checkout Page Customization: “Before” and “After” Screenshots
Before
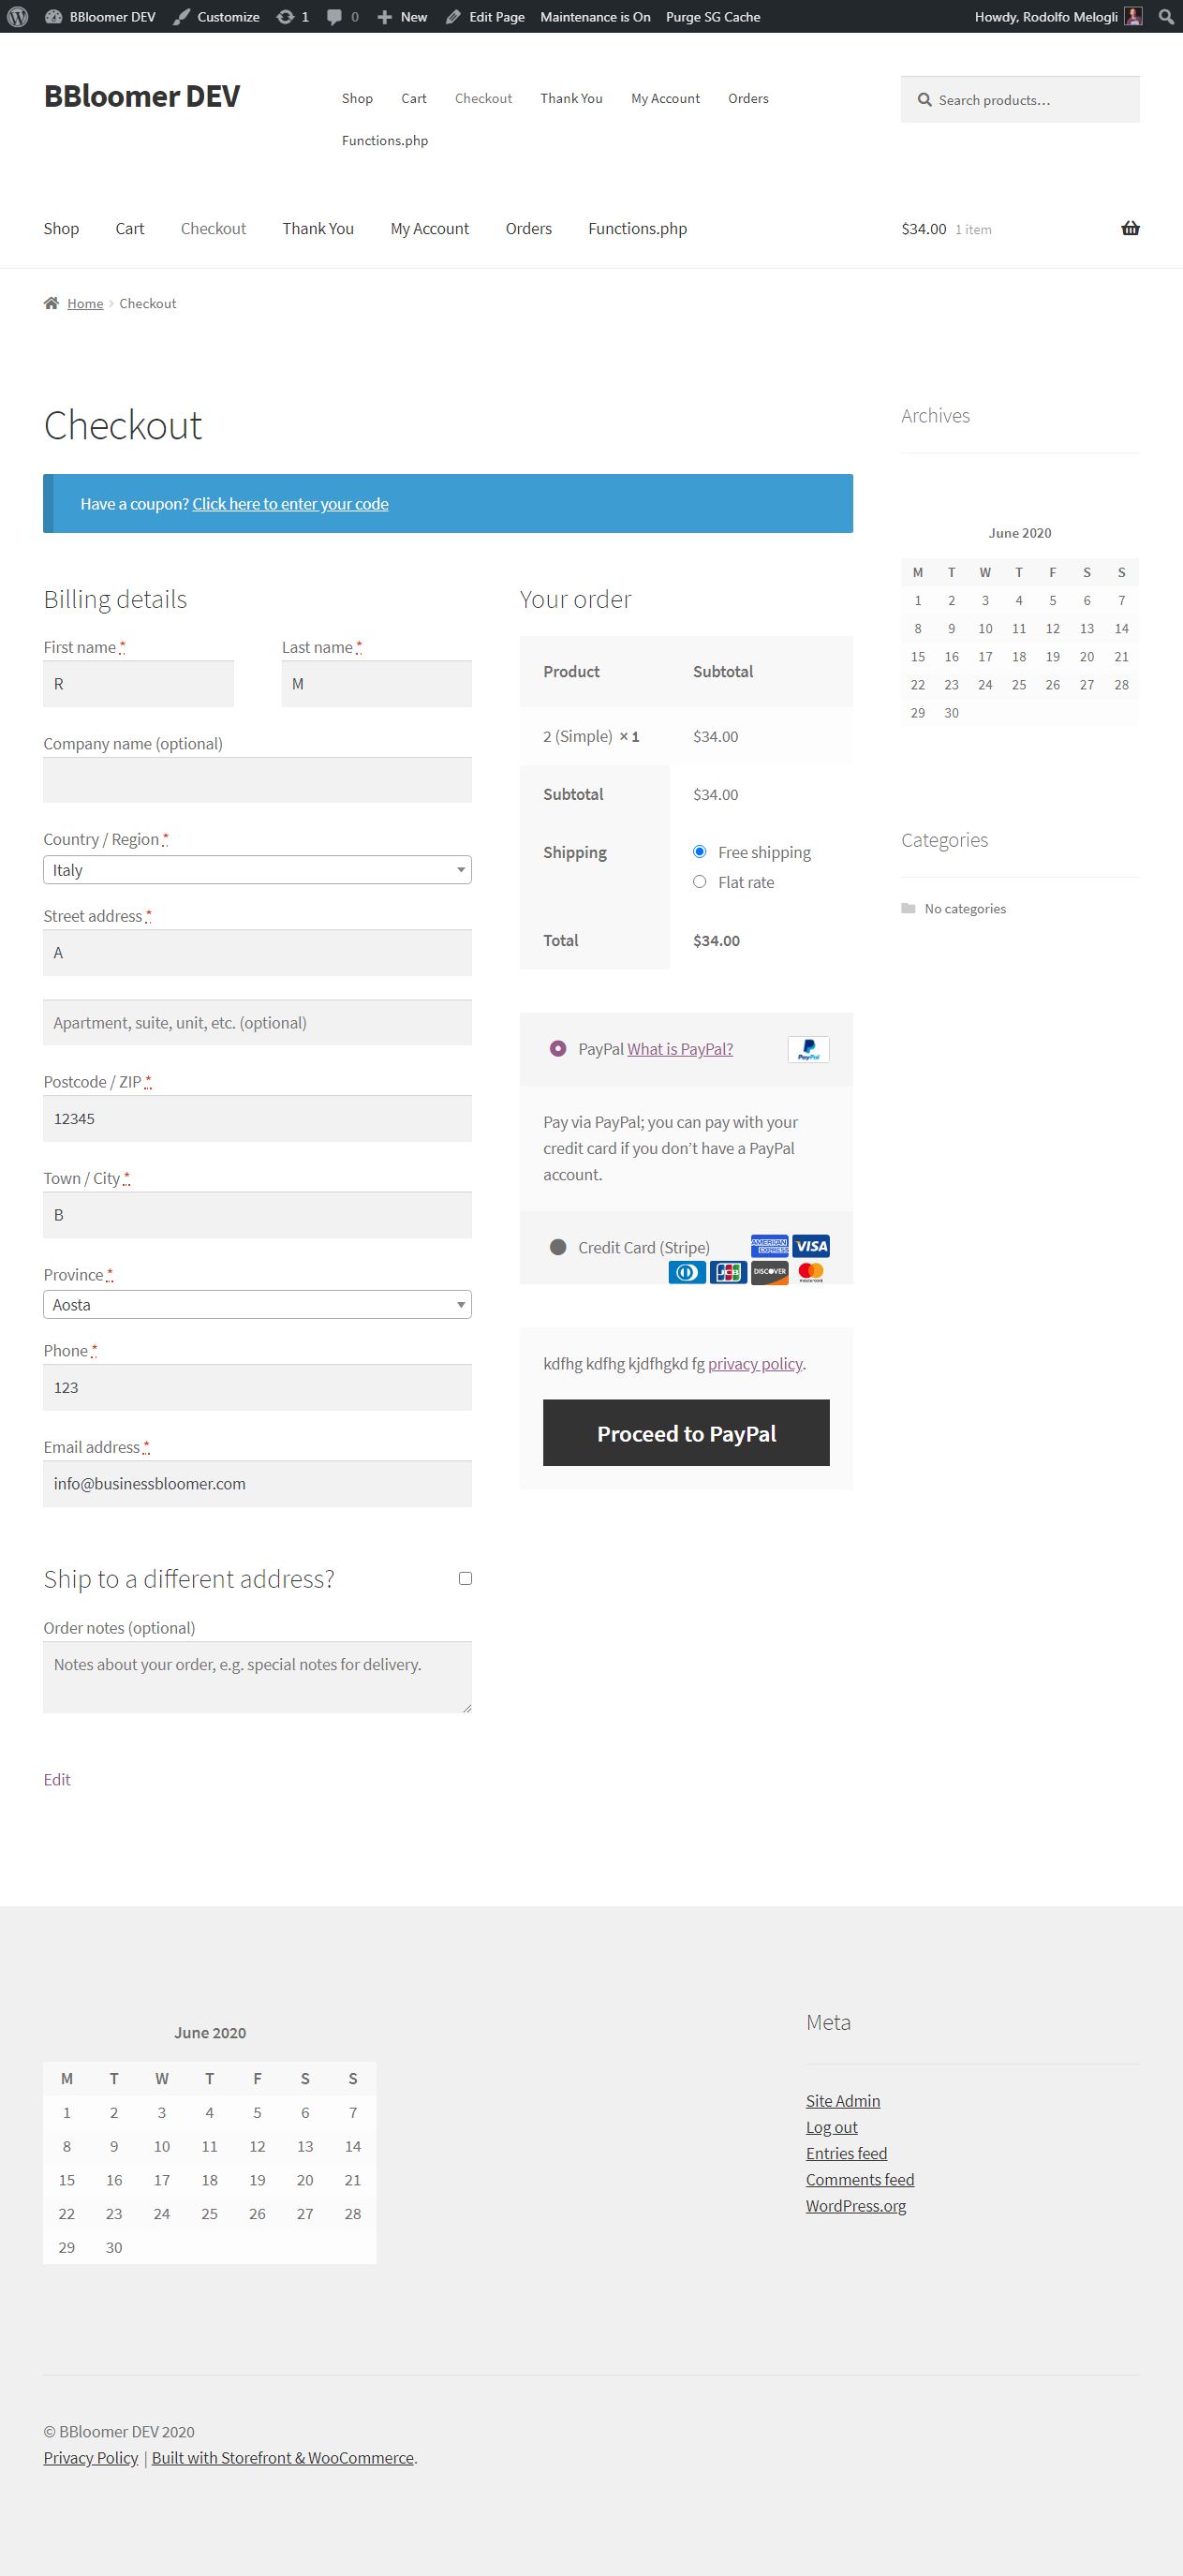
After